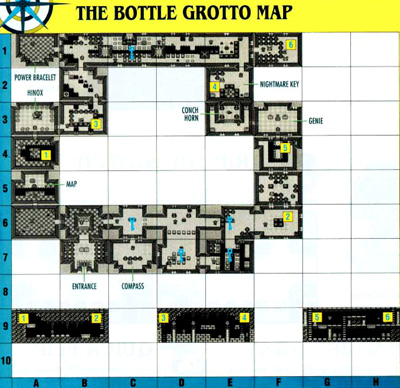
Level 2 - Bottle Grotto
Things to Find
- Power Bracelet
- 20 rupees
- 50 rupees
Map
Walkthrough
You will enter the dungeon in room 7B, but you can’t do anything here yet, so head on up to room 6B. Here, light the two torches in the center of the room by sprinkling Magical Powder on them and then head right to room 6C. Kill both enemies that are there and then claim the small key that appears. Open the locked door at the bottom of the room and go down to room 7C. Kill the creature in the room with a bomb, and then get the compass from the chest that will appear. Now head back up and right to room 6D. Strike the crystal switch with your sword and then continue down to room 7D. In room 7D, strike the crystal switch and then get the small key from the chest.
Now head right to room 7E. Leap across the gaps and stand on the floor switch, then get the small key from the chest. Now strike the crystal switch and then leap across the gaps and then head up to room 6E. In room 6E, kill the two enemies there with a bomb and then work back around to room 6D and then right to the left side of room 6E in order to get the key that appears when the enemies are defeated. Now head right to 6F and then up to 5F. In room 5F, push the two blocks together that are in the center of the room. This will cause a set of stairs to appear. These stairs lead to side-scrolling stage 9A–9B. Work through this stage and you will reappear in room 4A. From 4A head up to room 3A. Here you will fight Hinox (see strategy below).
From 3A, head right. In 3B leap the pits on the bottom of the screen and then head up to 2B. In 2B, work your way up, avoiding being sucked into one of the pits. You can also get the Fragment of a Stone Slab from the chest if you wish. Once in room 1B, go left. In room 1A, quickly light the two torches with Magical Powder and the two ghosts will leave. As soon as they are gone, a chest will appear that contains the Power Bracelet. Now head right to room 1C. Move the pots and then leap over the pit. Strike the switch, and then head over and grab the small key from the chest.
Now, standing on the lowered blocks on the right side of the switch, strike the switch again. Now head to the right, drop off the blocks and on down to room 1E. Now head down to room 2E. In room 2E, first push the blocks out of your way. Then destroy the imprisoned Pols Voice with a bomb or a pot, then kill the bat, and finally the Stalfos Knight. Now you can grab the Nightmare Key from the chest that appears. If you don’t do it in exactly this order, the chest will not appear. If you want, at this point, you can get the map. Use the stairs in the corner of 2E in order to get back to room 3B, then head over to 3A, and finally warp back to the entrance.
At the entrance, you can open the chest that was behind the pots. Now head up to 6B and then over to 6A. Kill both bats and then proceed up. In 5A claim the map from the chest. Now return the same way you came to get back to room 1E. Head over to room 1F. Destroy the two Pols Voice as well as the blob and then a set of stairs will appear. There is a small fairy under a pot in the bottom row if you need it. The stairs lead to the side-scrolling sequence of 9G–9H. In 9H, the platform will descend when you stand on it. In 9G, however, it will not. First, you must pick up the pot and carry it over and stand on the platform while carrying the pot. This will make the platform descend. Now go up the ladder and you will appear in room 4F. Jump across the pits and enter the door to face the Genie (see strategy below).
Once the Genie is gone, go to the left to room 3E and pick up the Conch Horn. Now you have completed Level 2!
Nightmares
Hinox
(item needed: Sword)
To defeat this cyclops simply hit him with your sword eight times. Dodge the bombs that he throws, avoid him when he charges, and he will soon pass on.
Genie
(items needed: Sword,* Power Bracelet*)
For this Nightmare it is a very good idea to get the Secret Medicine from Crazy Tracy. To defeat him, first dodge the fireballs that he throws at you. Once he goes into his bottle and starts to chase you, hit the bottle with your sword to freeze it, and then pick it up with your Power Bracelet and throw it. Then he will come back out and begin throwing fireballs at you all over again. Repeat this process three times. After the bottle shatters, dodge him when he is spinning around and hit him whenever he stops. Eight hits will turn him into dust.
