Level 5 - Catfish' Maw
Things to Find
- Hook Shot
- 50 rupees
- 200 rupees
- 50 rupees
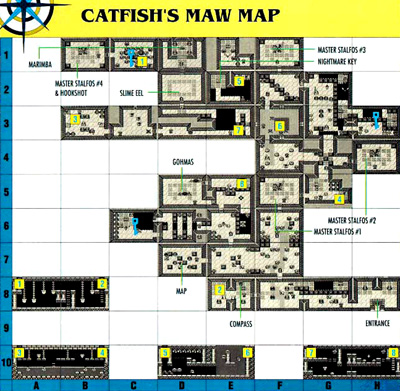
Map
 ## Walkthrough
You will begin the dungeon in room 8H. Head left to room 8F and then destroy all the enemies. Once all the enemies are gone, the door will open. Now head left to room 8E. Gather the compass from the chest and then head down the stairs. This will put you in the side-scrolling sequence of 8A–8B. Use the Roc’s Feather to leap across the platform, jumping before they move to much. Now go up the stairs and you will reappear in room 1C.
Shatter all of the crystal formations with your sword and then push the blocks together so that they form a square. Then collect the small key that drops from the ceiling. Now return back to room 8E. Destroy both enemies and then go right to room 8F. Now you can unlock the door at the top of the screen. Go up to room 7F and then left to room 7E. Destroy both enemies and the doors will open. Now go left again to room 7D. Kill both enemies in this room also and then grab the map out of the chest that appears. Now go back to room 7F and then up to 6F. Kill all three enemies and then go up to room 5F for a battle with Master Stalfos #1 (see strategy below).
Once Master Stalfos #1 is gone, go right to room 5G. The chest in this room used to contain the Hook Shot but Master Stalfos stole it. You will need to defeat him three more times in order to get it back. Now head up to room 4G. Push the center block up and then go left to room 4F. Now return to room 4G, push the center block to the right and then to up to room 3G. Now rether to room 4G and stand on the switch. Once the door is opened, push the center block down and then head right to room 4H. In this room you will face Master Stalfos #2 (see strategy below).
Once Master Stalfos #2 is toast, go back to room 4G. Push the block to the side and then head all the way up to room 2G and then right to room 2F. In room 2F you will need to destroy all of the blobs. One is reached by moving one of the pots and hitting him through the center blocks. Once they are all gone, the door will open and you can go up to room 1F where you will fight Master Stalfos #3 (see strategy below).
Once Master Stalfos #3 is dead, the door to the left will open and you can go into room 1E. The Fragment of a Stone Slab is located in the chest. Once all three enemies are gone the door will reopen. Now return back to room 8F. Destroy all of the enemies again to reopen the door. Now head left into room 8E and then down the stairs. Go back through the side-scrolling sequence 8A–8B the same as before and then you will reapppear in room 1C. Go to the left where you will face Master Stalfos #4 (see strategy below).
Once you have defeated Master Stalfos #4 (the last battle) he will drop the Hook Shot. Pick up the Hook Shot and then return to room 8E. Destroy both enemies (you will find the Hook Shot works very well against these enemies) and then continue right to room 8F. Now go to the top right of room 8F and then over to room 8G. Hook Shot over the pit to get to the chest. Now return to 8F, go up to 7F and then left to 7E. Destroy both enemies to open the doors and then go up to room 6E. From room 6E, go left and then Hook Shot across the gaps. Go through the upper door and then Hook Shot over to the chest. Pick up the small key from the chest and then exit out the lower door. Hook Shot back over the gaps and return to room 6E. Go over to the right side and fire the Hook Shot across the gap in to the retracted bridge. This will extend the bridge. Now head up to room 5E and unlock the block there. Now head left to room 5D where you will face the Grommas (see strategy below).
Once they are toast, head back out the lower door and back down to room 6E. Head down and around to return to room 5G. If at this point you want to read the Stone Slab, head down the stairs. In the side-scrolling sequence 10A–10B, leap the platforms across and then you will reappear in room 3B. Go right to room 3C where you will find the Stone Slab. Now return to room 5G. From room 5G head up to room 4G. Push the block up and then go left into room 4F. Then go up into room 3F. In room 3F, swim out into the center of the deep water and dive there. Under the water you will locate the entrance to the side-scrolling sequence of 10D–10E.
Swim through the sequence and then you will reappear in room 2E. Hook Shot over to extend the bridge and then walk over and pick up the Nightmare’s Key from the chest. Then return to room 3F. Head down and to the right to room 4G. Push the block to the side and then head up to room 3G. Jump the pit in front of the door and then angle jump over to the single block. Now Hook Shot up to the chest. After opening the chest, head to the right. Now Hook Shot over the gap and then go down and pick up a small key from the chest. Then return to the first chest. Head up and then Hook Shot up to extend this bridge.
Go up and gather the rupees from the chest there. Once that is done, play the #2 song on your Ocarina, Mambo’s song (you did learn it, right?) in order to return to the dungeon entrance. At the entrance, walk into the teleporter and return to room 5D. Now head to the right out the top door and then over to the stairs. The stairs lead to the side-scrolling sequence of 10G–10H. The heads on the walls in this sequence can be grabbed by the Hook Shot. You will reappear in room 3E. Unlock the block and then go up and Hook Shot across the gap. Now head to the left and then open the door. Go up to room 2D where you will face the Slime Eel (see strategy below).
Once the Slime Eel is dust, head up and retrieve the Wind Marimba. You are now finished with Level 5!
Nightmares
Master Stalfos
(item needed: Sword, bombs)
Master Stalfos is not very hard to beat. Just hit him with your sword until he collapses. Once he is down, plant a bomb on him and wait for it to explode and hurt him. Just repeat until he runs away or dies (depending on what time you are fighting him).
There is however a nifty trick that you can use to beat him. Hit him with your sword until he collapses and then equip the bombs and the bow and arrow. Use the explosive arrow trick that is listed in the Miscellaneous section (press A and B at the same time and you will fire explosive arrows). Fire four explosive arrows into him. They must all hit him before he stands up. If you do it right he will explode and drop a small key. These keys will really help you in opening doors and such. However you can only do this the first three times you fight him.
Grommas
(item needed: Hook Shot)
These two giant spiders are fairly easy to defeat. Simply wait until they open their mouths to shoot at you and then hit them in the mouth with your Hook Shot. Be sure to dodge them when they charge towards you. Six hits each will toast them. You can also use the bow and arrow to beat these enemies which will halve the number of hits that it takes to beat them. However it will use up your arrows.
Slime Eel
(item needed: Hook Shot)
This very strange creature will swing his tail at you from the hole in the center of the room. Dodge his tail, and whenever he sticks his head out and opens up his mouth from the four holes in the room, hit his open mouth with your Hook Shot. This maneuver will drag him out from the hole in the wall, and then hit him as many times as you can before he heads back in. Also, sometimes he will drag out and explode. Eight hits will kill him.