Level 6 - Face Shrine
Things to Find
- 50 rupees
- L2 Power Bracelet
- 100 rupees
- 100 rupees
- 50 rupees
- 200 rupees
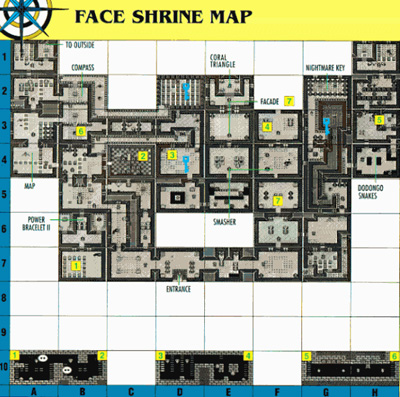
Map
 ## Walkthrough
When you first enter the dungeon at room 7D, head to the left into room 7C, on up to room 5C, and then over to 5B. In room 5B, plant a bomb on top of the crystal switch and then run up to the right exit at the top of the screen. As soon as the bomb blows, head up to room 4B. Plant another bomb at the middle of the right wall, where the floor tiles head into the wall. In the next room (room 4C), destroy all the enemies. As soon as they are all gone, a set of stairs will appear.
Head down the stairs and you will appear in the side-scrolling sequence 10A–10B. There is no way to destroy the faces, so continue on through the sequence dodging them the best you can, and you will soon reappear in room 7B. Now destroy all of the enemies and the door will open. In order to kill the disappearing enemies, simply plant a bomb on top of them as soon as they vanish. If you got the timing correct, when they once again become visible the bomb will explode and kill them. Once the door is open, go up into room 6B. The pot on the right has a small fairy under it and the chest on the left contains the Level 2 Power Bracelet. With this bracelets increased strength, you can now lift the elephant statues at the top of the screen and then go through the door which will return you to room 5B. Once back in room 5B, use the same bomb on the crystal switch as before. However, this time run up to the left entrance at the top. Once the bomb explodes, head up to room 4B.
Pick up the pot in the upper-left corner and stand on the switch to open the door. Now head left to room 4A. In room 4A, destroy all three disappearing enemies and then a chest will appear that contains the map. Some of the enemies may be on the other side of the crystal blocks, so you may have to do some inventive bomb throwing in order to defeat them. Then head up to room 3A and go right to room 3B. Collect the Fragment of a Stone Slab out of the chest and then return to room 3A. Now pick up one of the pots and throw it at the door at the top of the screen. Then head up to room 2A. From room 2A, go right to 2B and grab the compass out of the chest.
Go up the stairs at the top of the screen, hit the crystal switch, and then continue right. Follow this ledge on around to room 2D. Here use bombs to destroy the disappearing enemies as before, and then pick up the small key that drops from the ceiling. Now return to room 2A. In room 2A, pick up one of the elephant statues and throw it at the door at the top of the screen in order to open the door. In the room above, room 1A, collect the 100 rupees from the chest and then head up the stairs at the top of the screen. You will appear on a small island in the middle of the raft ride. Near you is a chest, open it and you will receive a Secret Seashell. Now return to the dungeon.
Once back in room 1A, take a bomb and throw it over the crystal blocks. This will trip the switch. Now take your Power Bracelet and pick up the chess pieces laying on the floor. You will need to throw them in such a way that they both land upright. If one of them doesn’t land correctly, you will have to start all over again. Once they are both upright the door will open. Now head down to room 2A, climb the steps on the left side and drop down on the other side. Then continue on down to room 4A. Here, toss a bomb over the crystal blocks and then dash to the right to avoid getting trapped. Now head right to room 4B. If you want to read the Stone Slab, go up the stairs in the upper-right corner. Then travel down the ledge and you will find the Stone Slab at the end. When you are done, go back and return to room 7C. Here, use the same bomb technique to destroy the disappearing enemies and then the door will open.
Head up to room 5C. Grab the 50 rupees from the chest and then pick up the elephant statue and continue up. In the next room, pick up 100 rupees from the chest. Now head out the door on the left back in to room 5B. There, hit the crystal switch and then return to room 7D (the entrance). From room 7D, go to the right into room 7F. Here the floor tiles will come up and attack you, so tuck yourself into a corner with your shield equipped and they will shatter when they hit you. Once they are all gone, the door will open. In the room above, room 6F, pick up one of the elephant statues and throw it at the door on the right inorder to open it. Now head into room 6G and use your bombs to kill thevanishing enemies. This will open both doors. Once both doors are open,go into the bottom one.
Climb the stairs on the left side of the roomand then drop off onto the raised crystal blocks. Walk up and then leapover to the other block in front of the stairs. Head up the stairs andthen walk up and over, where you can get the 50 rupees out of thechest. Now head through the top door and continue on up the waterfilled path to room 3G. Now pick up the small key out of the chest. Nowreturn to room 6F, unlock the top door, and then head up to room 5F. Here, plant a bomb at the center of the top wall to open a door. Now head up to room 4F where you will fight Smasher (see strategy below).
Now go up to room 3F. If you continue up, you will reappear in room 5F and then continue this cycle. To break the cycle, in room 3F lift the left elephant statue and go down the stairs that you will find there. This will take you to the side-scrolling sequence 10D–10E. Use timing on the jumps and you will soon reappear in room 4D. Use your shield to shatter all the tiles that attack you and then pick up the small key that will drop from the ceiling. Now head up, unlock the block, and continue up to room 3D. Here, pick up the elephant statue and throw it at the door on the left in order to open it.
In the next room to the left use the same as before to throw the statues until they both stand up in order to open the doors. Once the doors are opened, continue on to the left and head down the stairs. This will put you in the side-scrolling sequence of 10G–10H. Simply use the Pegasus Boots to dash under the falling blocks and you will then reappear in room 3H. You can either try and plant bombs to destroy the three Pols Voice, or you can use the tactic from the Miscellaneous section and play the “Ballad of the Wind Fish” and they will all explode. This will open both doors. Now head up, travel through 2H and into 1H. Grab 200 rupees out of the chest, throw the heads to open the door, and then head back down to room 3H. From here, go down to 4A where you will fight the Dodongo Snakes (see strategy below).
Once they are defeated, head out the door to the left. Hook Shot over to the block, unlock the second block, and then continue up to room 2G. Pick up one of the pots and throw it at the chest to open it. This will reward you with the Nightmare’s Key. Now it is time to head for the Nightmare’s Lair. Go back to room 4G and drop off into the water. Travel back down to room 5G, destroy the enemies to open the door, and then head left to room 5F. Now head straight up to room 3F. Here, lift the left elephant statue as before and head back through the side-scrolling sequence 10D–10E. Once you are back in room 4D, head down to room 5D.
Once in room 5D, work your way around the center pit allowing the blobs that appear to be sucked in to the pit, but not falling in yourself. Once all the blobs are gone the doors will open. Now go right to room 5E. Once there, push the very bottom block to the right. Now toss a bomb up over the pit to destroy the disappearing enemy while using the block as a shield against the turret. With the enemy gone, the doors will open. Now leap up over the pit, push that block into the pit, and then run up and into room 4E. In room 4E, if you light the two unlit torches with Magic Powder, the round, fuzzy creatures will turn into small fairies. Now head up into room 3E where you will fight the Facade (see strategy below).
Once he is gone, go up to room 2E where you will obtain the Coral Triangle. Level 6–Face Shrine is behind you!
Nightmares
Smasher
(item needed: Power Bracelet)
This strange creature will throw his ball at you. After he throws it, pick it up before he can get it and then hit him with it. Only four hits and he will be toast.
Dodongo Snakes
(item needed: bombs)
These snakes are the same as you fought in Level 3. To defeat them, throw bombs in such a way so that the creatures will eat them. The bombs will explode inside them and hurt them. Three hits each will destroy them.
Facade
(items needed: Sword, Bombs)
When fighting this enemy, first destroy all the tiles that come at you with your sword. Then, dodging the pits that randomly appear in the floor, plant a bomb on the face on the floor. After the bomb explodes, wait for the face to reappear and then repeat the process. Five bombs will do the trick.